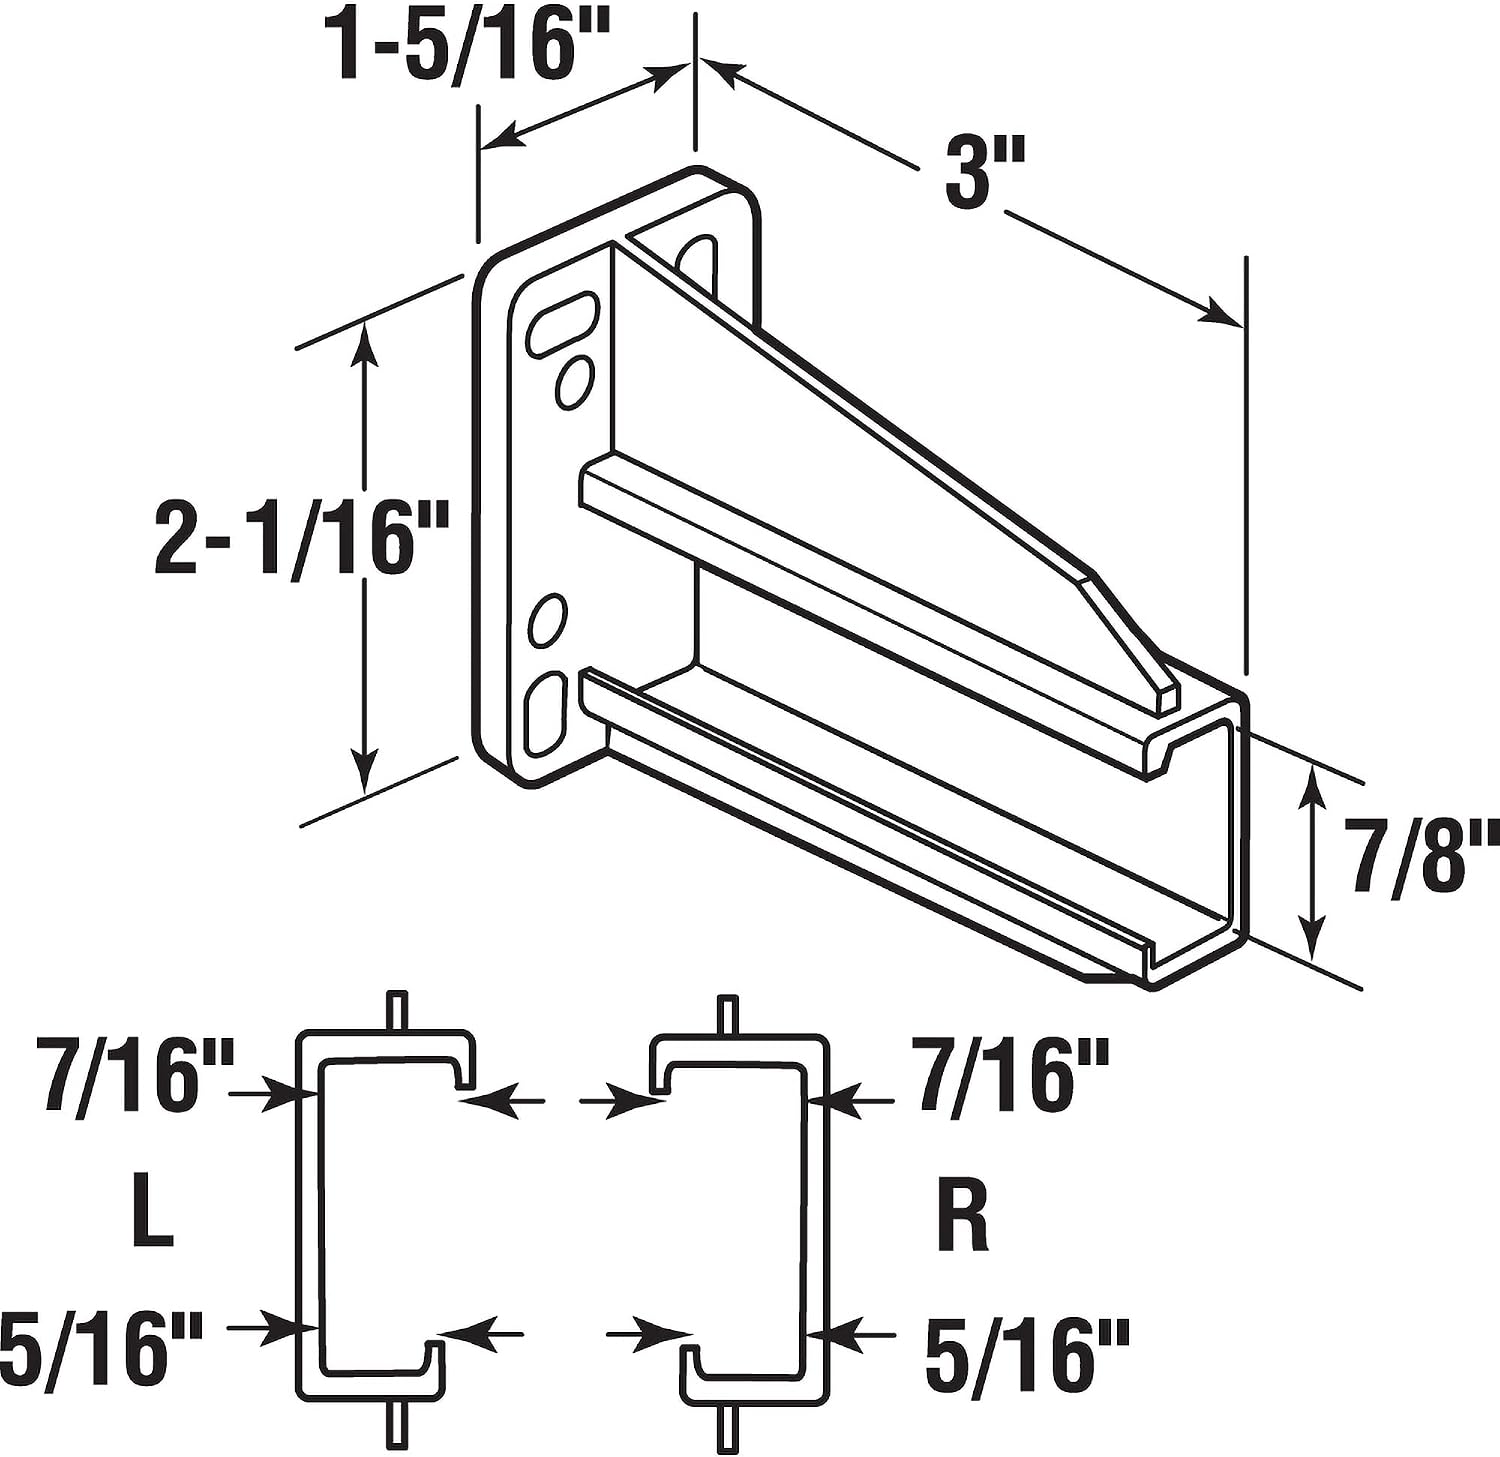
If your kitchen drawers are doing that slow, side-to-side wobble every time you pull them open — like they’re loosening from some invisible hinge — don’t panic, and don’t order new slides yet. A drawer slide system has two ends: the front, which mounts to the cabinet face frame or side wall, and the back, where a small plastic piece called a rear bracket (sometimes called a rear socket or rear mounting clip) holds the slide’s tail end to the cabinet box wall. That tiny bracket takes a surprising amount of lateral stress every single day, and when it cracks or breaks, the whole drawer goes sloppy. The good news is that replacing a rear bracket is one of the most cost-effective repairs in cabinetry — typically a few dollars per bracket — and you can do it without pulling the slides out entirely. This guide walks you through diagnosis, measurement, part selection, and installation, including a real-world trimming trick that reviewers have found essential.
How to Know Whether You Need a Rear Bracket or a Full Slide Replacement
This is the first fork in the road, and getting it right saves you money and frustration. Here’s the diagnostic framework:
Signs it’s the rear bracket:
- The drawer wobbles side-to-side or drops at the back but still rolls in and out on the track reasonably smoothly
- You can see a cracked, snapped, or missing plastic clip at the back of the cabinet box where the slide rail terminates
- The slide itself — the metal channel that runs along the side or bottom of the drawer — looks intact and straight
- The wobble started suddenly, not gradually over years
Signs you may need the full slide:
- The drawer binds, catches, or grinds during travel
- The slide rail is visibly bent, corroded, or has broken ball-bearing retainers
- The drawer no longer fully closes or stays closed
- The wobble has been present for years and worsened progressively
This Old House’s guide on cabinet drawer repairs notes that rear-mount failures are among the most common and most under-diagnosed drawer problems, precisely because homeowners assume the slide itself is broken when the actual failure is the much cheaper bracket. Family Handyman similarly points to the rear socket as the first thing to inspect before condemning a slide.
By the numbers:
- Full slide replacement (pair): $15–$60+ depending on brand and extension type
- Rear bracket replacement (per bracket): $4–$12 for most residential hardware
- Time to replace a bracket (experienced): 15–25 minutes
- Time to replace full slides: 45–90 minutes per drawer, including realignment
If the slide itself is straight and functional, replacing only the bracket is almost always the right call.
Measuring a Broken Rear Bracket When You Don’t Know the Brand
This is where most people get stuck, and the honest answer is: you’re probably going to buy this part by eye, comparing your broken piece to product listing photos. That’s not a hack — it’s exactly how experienced remodelers do it, and it works reliably once you know what to measure.
The three dimensions that matter:
-
Track width acceptance — the width of the slot or channel that the end of the slide rail slides into. This is usually either a narrow slot (for standard side-mount slides) or a wider channel (for full-extension or European-style slides). Measure the end of your existing rail, not the bracket cavity.
-
Mounting hole pattern — most rear brackets screw into the back wall of the cabinet box. Measure the distance between the screw holes on your broken bracket, or on the mounting marks left on the cabinet wall. Common patterns are 32mm spacing (standard in European/frameless cabinets on the 32mm system) or a single-center-mount design.
-
Overall profile height and depth — the bracket has to fit in the space between the slide and the cabinet wall. In shallow drawer cavities — spice drawers, narrow base cabinets — this clearance can be as little as a half-inch, and an oversized replacement bracket physically won’t fit.
Apartment Therapy’s hardware repair overview recommends photographing the broken bracket next to a ruler before shopping, because it gives you a reference image you can compare directly to product photos on any device.
One reviewer’s documented approach to the Prime-Line R 7265 (a rear socket designed for use with 200-series style slides) confirms the “compare-by-photo” method: they described purchasing the part without knowing the original brand, then experiencing immediate relief when the bracket snapped into place correctly on the first try. The same reviewer called out measuring inside an installed cabinet as genuinely awkward — you’re reaching into a dark, tight space — but manageable with a flashlight and a flexible tape or small ruler.
The Three Prime-Line Brackets and What Real Owners Report
Prime-Line is the most consistently recommended aftermarket rear bracket brand across the Houzz community, and their three primary residential SKUs cover the majority of common residential slide configurations. Here’s what the owner review record actually shows for each:
Prime-Line R 7227
The R 7227 is a general-purpose rear bracket for standard side-mount slides. The most practically useful installation detail in the review record comes from a four-star reviewer who documented a real-world problem: their slide rail had a slight downward bend at the point where the bracket attaches — not uncommon in older cabinets where the slide has been stressed or the cabinet box has shifted slightly over time. The bracket’s plastic socket didn’t seat flush against the bent rail.
Their fix: trim the bracket’s plastic body with a pocket knife to relieve the area where the bend was creating interference. A few shallow passes with the knife, test-fit, repeat. The bracket seated correctly after minor material removal and has held without issue.
This is worth documenting clearly because it’s not intuitive: plastic rear brackets are designed to be trimmed. The material is soft enough that a sharp utility knife or pocket knife works cleanly. If your bracket seems close but won’t seat flush, look for where the plastic is hitting the rail or wall and relieve that contact point incrementally. Don’t force it.
The “bought one, then bought more for every other drawer” pattern repeats across R 7227 reviews consistently — which tells you the per-unit economics make bulk replacement sensible once you’ve confirmed fit on the first one.
Prime-Line R 7265
The R 7265 is the bracket that one verified reviewer confirmed as a direct working replacement for discontinued Merillat rear sockets. If you’re working on Merillat cabinets from the 1990s or early 2000s — a common scenario in flip properties and older rentals — this is the part to start with.
Merillat stopped producing their original rear socket hardware, and the challenge with discontinued parts is that you can’t simply order a factory replacement. The R 7265’s geometry is close enough to Merillat’s original spec that it functions as a drop-in. The reviewer flagged that measuring inside an installed cabinet is the real friction point (not the part itself), and recommended removing the drawer completely first so you can get a clear line of sight and a straight measurement on the bracket mounting area.
Prime-Line R 7240 Nylon Side Track Brackets
The R 7240 is designed for side-track configurations — slightly different geometry from the R 7227’s standard mount. Two consistent themes in the owner review record:
First, shallow drawer cavities are genuinely challenging with this bracket. If you’re repairing a spice drawer, a narrow pullout, or any cabinet where the space between the back wall and the drawer box is under about three-quarters of an inch, expect a tight fit. Reviewers report that working with a right-angle screwdriver or a short-shank driver bit makes the difference.
Second, replace the included screws. Multiple R 7240 reviewers note that the screws supplied with the bracket are adequate for installation but that substituting screws from your own inventory — a slightly longer #6 or #8 with a coarser thread — produces a noticeably firmer hold in the particle-board or MDF back walls common in stock and semi-custom cabinet boxes. This is practical advice: the provided hardware is functional, but if you’re doing this repair on rental property or a flip where you want the fix to last five-plus years without revisiting, use your own fasteners.
Installation Without Removing the Slides: Step-by-Step
The question we hear most often is whether you have to pull the entire slide to replace the rear bracket. In the majority of cases, you do not.
Here’s the practical workflow:
-
Remove the drawer box — lift the front slightly to disengage the release lever (on soft-close slides) or simply pull straight through on older slides. Set the drawer aside.
-
Inspect the rear bracket in place — with the drawer out, you have clear access to the back of the slide. Use a flashlight. Note whether the bracket is cracked, snapped off entirely, or just partially detached.
-
Remove the broken bracket — most clip or snap onto the rail end and are held by one or two screws to the cabinet back wall. Unscrew, unclip, and extract. Keep the broken piece for measurement comparison.
-
Test-fit the replacement — before screwing anything, slide the new bracket onto the rail end and confirm it seats without rocking or gaps. This is where trimming (as documented by R 7227 reviewers) may be needed if the rail has any bend.
-
Mount to the cabinet back wall — drive your screws (supplied or your own) into the back wall. In frameless cabinets, you’re hitting the panel directly. In face-frame cabinets, you may be hitting a nailer strip. Either way, pre-drilling a pilot hole in MDF or particle-board prevents splitting.
-
Reinstall the drawer and test — slide the drawer back in and cycle it 8–10 times, applying light lateral pressure to check for wobble. A correctly installed bracket eliminates side-to-side play entirely.
Family Handyman’s cabinet repair guide emphasizes that final alignment testing — the 8–10 cycle check with lateral pressure — is the step most DIYers skip, and it’s the step that reveals whether a screw needs a quarter-turn more or the bracket needs to shift slightly before the wall anchor sets completely.
Frequently Asked Questions
How do I know if my wobbly drawer needs a rear bracket replacement or a full slide replacement?
Pull the drawer out and look at the back of the cabinet box where the slide ends. If you see a cracked, missing, or detached plastic clip at the slide’s tail, that’s your culprit. If the slide rail itself is bent, corroded, or has broken bearing components, the slide needs replacement. Most sudden-onset wobble in otherwise functional drawers is a bracket, not the slide.
How do I measure a broken rear bracket to find the right replacement if I don’t know the brand?
Photograph the broken bracket next to a ruler before you do anything else. Then measure the track-acceptance slot width (the opening that grabs the end of the rail), the screw-hole spacing, and the overall depth. Houzz community members consistently report that comparing a ruler photo to product listing photos is effective enough to get the right part on the first try.
Will these Prime-Line brackets work as replacements for Merillat or other older cabinet brand slides?
The Prime-Line R 7265 has a confirmed owner record as a working replacement for discontinued Merillat rear sockets. For other older brands, the geometry varies — but the measurement-and-compare approach works for most standard residential side-mount configurations. If your slides are an unusual vintage or proprietary design, remove the slide and bring it to a hardware specialty counter for a physical comparison.
Do the replacement brackets come with screws, or do I need to supply my own?
Prime-Line brackets typically include screws. For the R 7240 specifically, multiple owners recommend substituting your own fasteners — a slightly longer, coarser-thread screw — for a more secure hold in particle-board or MDF back walls. It’s a minor upgrade worth making on any repair where longevity matters.
Can I do this repair myself without removing the cabinet drawer slides entirely?
Yes, in most cases. Remove the drawer box, access the rear bracket through the now-open drawer cavity, swap the bracket, and reinstall. You only need to pull the full slide if the bracket’s mounting position is inaccessible with the slide in place — which is uncommon in standard base cabinet configurations.
The Decision Rule
If the drawer wobbles, rolls smoothly otherwise, and you can see a broken plastic bracket at the back of the slide: buy the bracket, not the slide. Start with the Prime-Line R 7227 for standard side-mount slides, the R 7265 if you’re working on Merillat or similar vintage hardware, or the R 7240 for side-track configurations. Confirm fit on one drawer before buying in bulk — then buy in bulk, because the same bracket failure pattern repeats across every drawer in the same kitchen. Bring your own screws for the R 7240. And if the bracket won’t seat flush, reach for a pocket knife before you reach for your credit card.